Introduction to STM32 Nucleo
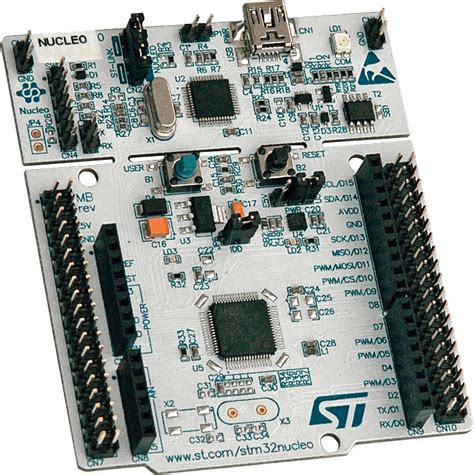
The STM32 Nucleo is a popular development board series from STMicroelectronics, designed for prototyping and learning embedded systems using ARM Cortex-M microcontrollers. These boards offer a convenient and cost-effective way to get started with STM32 microcontrollers and develop a wide range of applications, from simple projects to complex IoT solutions.
Key Features of STM32 Nucleo Boards
- ARM Cortex-M Microcontrollers: STM32 Nucleo boards feature powerful ARM Cortex-M microcontrollers, ranging from the entry-level Cortex-M0 to the high-performance Cortex-M7.
- Arduino Uno Compatibility: Most STM32 Nucleo boards are compatible with Arduino Uno, allowing you to leverage the vast ecosystem of Arduino shields and libraries.
- Integrated ST-LINK/V2-1 Debugger/Programmer: The on-board ST-LINK/V2-1 debugger/programmer enables easy programming and debugging of the microcontroller without the need for an external tool.
- Extensible with Expansion Boards: STM32 Nucleo boards can be extended with various expansion boards, such as the X-NUCLEO and P-NUCLEO series, which offer additional functionalities like sensors, actuators, and communication interfaces.
- Mbed Enabled: Most STM32 Nucleo boards are Mbed enabled, allowing you to use the Mbed online compiler and the vast library of Mbed software components.
Connecting STM32 Nucleo to Your PC
To start developing with your STM32 Nucleo board, you need to connect it to your PC. Follow these steps to set up the connection:
Step 1: Install the Required Drivers
- Download and install the ST-LINK/V2-1 USB driver from the STMicroelectronics website: ST-LINK/V2-1 USB driver
- If you plan to use the serial communication functionality of the STM32 Nucleo board, you may also need to install a USB-to-UART driver, such as the STMicroelectronics Virtual COM Port driver: STM32 Virtual COM Port driver
Step 2: Connect the STM32 Nucleo Board to Your PC
- Using a USB Type-A to Mini-B cable, connect the USB connector on the STM32 Nucleo board to a USB port on your PC.
- The ST-LINK/V2-1 debugger/programmer should be recognized by your PC, and the necessary drivers should be automatically installed.
Step 3: Verify the Connection
- Open the Device Manager on your PC (press Windows Key + X, then select Device Manager).
- Look for “STM32 STLink” under “Universal Serial Bus controllers” to verify that the ST-LINK/V2-1 debugger/programmer is recognized.
- If you installed the Virtual COM Port driver, you should also see a new COM port under “Ports (COM & LPT).”

Programming the STM32 Nucleo Board
There are several ways to program your STM32 Nucleo board, depending on your preferred development environment and programming language. Some popular options include:
STM32CubeIDE
STM32CubeIDE is an all-in-one development environment provided by STMicroelectronics for programming STM32 microcontrollers, including the STM32 Nucleo boards.
- Download and install STM32CubeIDE from the STMicroelectronics website: STM32CubeIDE
- Launch STM32CubeIDE and create a new project for your specific STM32 Nucleo board.
- Write your code in C/C++ using the provided libraries and examples.
- Build the project and program the STM32 Nucleo board using the integrated ST-LINK/V2-1 debugger/programmer.
Arduino IDE
If your STM32 Nucleo board is Arduino Uno compatible, you can use the Arduino IDE to program it using the familiar Arduino programming language and libraries.
- Download and install the Arduino IDE from the official Arduino website: Arduino IDE
- Install the STM32 Nucleo board package in the Arduino IDE:
- Open the Arduino IDE and go to File -> Preferences.
- In the “Additional Boards Manager URLs” field, enter:
https://github.com/stm32duino/BoardManagerFiles/raw/master/package_stmicroelectronics_index.json - Go to Tools -> Board -> Boards Manager, search for “STM32,” and install the “STM32 Cores” package.
- Select your STM32 Nucleo board from the Tools -> Board menu.
- Write your code using the Arduino programming language and libraries.
- Upload the sketch to the STM32 Nucleo board using the on-board ST-LINK/V2-1 debugger/programmer.
Mbed Online Compiler
For Mbed-enabled STM32 Nucleo boards, you can use the Mbed online compiler to write and compile your code in the cloud.
- Sign up for an account on the Mbed website: Mbed
- Import your STM32 Nucleo board into the Mbed online compiler.
- Write your code using the Mbed C/C++ SDK and the provided libraries.
- Compile the code and download the binary file.
- Drag and drop the binary file onto the STM32 Nucleo board’s USB storage device to program the microcontroller.

Expansion Boards and Shields
STM32 Nucleo boards can be extended with various expansion boards and shields to add new features and functionalities. Some popular options include:
X-NUCLEO Boards
X-NUCLEO boards are expansion boards designed to be stacked on top of STM32 Nucleo boards, providing additional sensors, actuators, and communication interfaces.
| Board Name | Key Features |
|---|---|
| X-NUCLEO-IDB05A1 | Bluetooth Low Energy (BLE) expansion board |
| X-NUCLEO-IKS01A2 | Motion MEMS and Environmental Sensor expansion board |
| X-NUCLEO-NFC01A1 | Near Field Communication (NFC) expansion board |
P-NUCLEO Boards
P-NUCLEO boards are power supply and motor driver expansion boards designed to be stacked on top of STM32 Nucleo boards.
| Board Name | Key Features |
|---|---|
| P-NUCLEO-IHM001 | Stepper motor driver expansion board |
| P-NUCLEO-IHM002 | Brushless DC motor driver expansion board |
| P-NUCLEO-IHM003 | Dual brush DC motor driver expansion board |
Arduino Shields
Since most STM32 Nucleo boards are Arduino Uno compatible, you can use a wide variety of Arduino shields to add new features to your projects.
| Shield Name | Key Features |
|---|---|
| Ethernet Shield | Adds Ethernet connectivity to your STM32 Nucleo board |
| Wi-Fi Shield | Adds Wi-Fi connectivity to your STM32 Nucleo board |
| LCD Shield | Adds a character or graphic LCD display to your STM32 Nucleo board |

Frequently Asked Questions (FAQ)
-
Q: What is the difference between STM32 Nucleo boards and Arduino boards?
A: STM32 Nucleo boards are based on ARM Cortex-M microcontrollers, which are more powerful and feature-rich compared to the AVR microcontrollers used in most Arduino boards. However, many STM32 Nucleo boards are Arduino Uno compatible, allowing you to use Arduino shields and libraries. -
Q: Can I use STM32 Nucleo boards for commercial projects?
A: Yes, STM32 Nucleo boards can be used for both personal and commercial projects. However, you should always check the licensing terms of any software libraries or tools you use in your project. -
Q: Do I need an external programmer to program STM32 Nucleo boards?
A: No, STM32 Nucleo boards come with an integrated ST-LINK/V2-1 debugger/programmer, which allows you to program and debug the microcontroller directly from your PC using a USB connection. -
Q: Can I use STM32 Nucleo boards with real-time operating systems (RTOS)?
A: Yes, STM32 Nucleo boards are compatible with various real-time operating systems, such as FreeRTOS, ChibiOS, and Mbed OS, which can help you manage complex, multitasking embedded systems. -
Q: Where can I find examples and tutorials for STM32 Nucleo boards?
A: STMicroelectronics provides a wide range of examples and tutorials for STM32 Nucleo boards on their website, including the STM32Cube ecosystem, which offers software libraries, drivers, and example projects. You can also find many user-contributed examples and tutorials on platforms like GitHub, Hackster.io, and Instructables.
Conclusion
STM32 Nucleo boards are powerful and versatile development boards that offer an excellent starting point for learning and prototyping with ARM Cortex-M microcontrollers. With their Arduino Uno compatibility, integrated debugger/programmer, and expandability through various shields and expansion boards, STM32 Nucleo boards enable you to create a wide range of projects, from simple applications to complex IoT solutions.
By following the steps outlined in this article, you can easily connect your STM32 Nucleo board to your PC, set up your preferred development environment, and start programming your microcontroller. With the wealth of resources available, including software libraries, examples, and tutorials, you’ll be well on your way to creating innovative embedded systems using STM32 Nucleo boards.
No responses yet