Understanding Countersinks and Counterbores in PCB Design
When designing printed circuit boards (PCBs), it is essential to understand the various techniques used to create holes and mounting points for components. Two common methods are countersinking and counterboring. While both involve creating recesses in the PCB, they serve different purposes and have distinct characteristics. In this article, we will explore the differences between countersinks and counterbores in PCBs, their applications, and their impact on the overall design and functionality of the board.
What is a Countersink?
A countersink is a conical recess created around a hole in a PCB. The primary purpose of a countersink is to allow the head of a flat-head screw to sit flush with the surface of the board. This technique is commonly used when mounting components or securing the PCB to an enclosure.
Characteristics of a Countersink
- Conical shape: A countersink has a conical profile, with the diameter gradually increasing from the bottom of the hole to the surface of the PCB.
- Angle: The angle of a countersink is typically 82 degrees, which corresponds to the angle of a standard flat-head screw.
- Depth: The depth of a countersink is determined by the thickness of the screw head and the desired level of flush mounting.
Applications of Countersinks in PCBs
- Mounting components: Countersinks are often used when mounting components with flat-head screws, such as connectors or switches. This ensures a secure and flush fit.
- Securing PCBs: Countersinks can be used to secure a PCB to an enclosure or chassis using flat-head screws, providing a clean and professional appearance.
- Reducing component height: By allowing screw heads to sit flush with the surface, countersinks help reduce the overall height of the assembLED PCB.
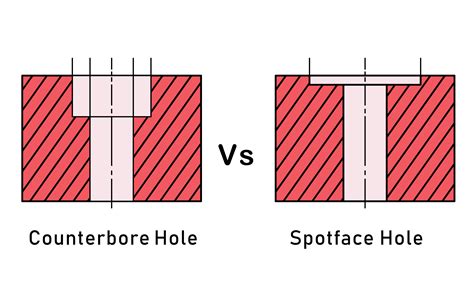
What is a Counterbore?
A counterbore is a cylindrical recess created around a hole in a PCB. Unlike a countersink, a counterbore has a flat bottom and is designed to accommodate the entire head of a screw or other fastener. Counterbores are typically used when a screw head needs to be recessed below the surface of the board.
Characteristics of a Counterbore
- Cylindrical shape: A counterbore has a cylindrical profile, with a constant diameter throughout its depth.
- Flat bottom: The bottom of a counterbore is flat, allowing the screw head to rest evenly within the recess.
- Depth: The depth of a counterbore is determined by the height of the screw head and the desired level of recessed mounting.
Applications of Counterbores in PCBs
- Recessed mounting: Counterbores are used when a screw head needs to be recessed below the surface of the PCB, such as when using pan-head or socket-head screws.
- Clearance for components: Counterbores can provide clearance for tall components on the opposite side of the board, preventing interference with the screw head.
- Mechanical strength: By distributing the load of the screw over a larger area, counterbores can increase the mechanical strength of the mounting point.
Comparing Countersinks and Counterbores
| Characteristic | Countersink | Counterbore |
|---|---|---|
| Shape | Conical | Cylindrical |
| Bottom | Pointed | Flat |
| Screw Type | Flat-head | Pan-head or Socket-head |
| Mounting | Flush | Recessed |
| Depth | Screw head thickness | Screw head height |
Choosing Between a Countersink and a Counterbore
When deciding whether to use a countersink or a counterbore in your PCB design, consider the following factors:
- Screw type: The type of screw you plan to use will determine whether a countersink or counterbore is more appropriate. Flat-head screws require countersinks, while pan-head or socket-head screws work best with counterbores.
- Mounting requirements: If you need the screw head to sit flush with the surface of the PCB, a countersink is the better choice. If you require the screw head to be recessed below the surface, opt for a counterbore.
- Component clearance: If there are tall components on the opposite side of the board that may interfere with the screw head, a counterbore can provide the necessary clearance.
- Mechanical strength: Counterbores distribute the load of the screw over a larger area, which can increase the mechanical strength of the mounting point. This may be a consideration in applications with high vibration or stress.
- Aesthetics: Countersinks provide a clean, flush appearance, while counterbores result in a recessed screw head. The choice may depend on the desired visual appeal of the assembled PCB.
Best Practices for Countersinking and Counterboring
When incorporating countersinks or counterbores into your PCB design, keep the following best practices in mind:
- Hole Size: Ensure that the hole diameter is appropriate for the screw size and type. The hole should be slightly larger than the screw shaft to allow for easy insertion and removal.
- Recess depth: Calculate the correct depth for the countersink or counterbore based on the screw head dimensions and desired mounting level. Insufficient depth may prevent proper seating, while excessive depth can weaken the PCB.
- Plating: Consider plating the holes and recesses to improve electrical conductivity and prevent corrosion. This is particularly important when using metal screws or in environments with high humidity.
- Tolerances: Allow for appropriate tolerances in your design to accommodate manufacturing variations. Consult with your PCB manufacturer for recommended values.
- Placement: Position countersinks and counterbores strategically to avoid interference with traces, components, or other features on the PCB.

FAQ
1. Can I use a counterbore with a flat-head screw?
While it is possible to use a flat-head screw with a counterbore, it is not ideal. Flat-head screws are designed to sit flush with the surface and work best with countersinks. Using a flat-head screw in a counterbore may result in an uneven or unstable connection.
2. How do I calculate the depth of a countersink?
To calculate the depth of a countersink, you need to know the thickness of the screw head and the desired level of flush mounting. The depth should be equal to or slightly greater than the thickness of the screw head to ensure a proper flush fit.
3. Can I use a countersink and a counterbore on the same hole?
Yes, it is possible to use a countersink and a counterbore on the same hole. This combination is called a “counter-countersink” and is used when you need a flush mount for a flat-head screw but also require clearance for components on the opposite side of the board.
4. How do countersinks and counterbores affect the mechanical strength of the PCB?
Counterbores generally provide greater mechanical strength than countersinks, as they distribute the load of the screw over a larger area. However, both countersinks and counterbores can weaken the PCB if the recess depth is excessive. It is essential to calculate the appropriate depth and allow for proper tolerances to maintain the integrity of the board.
5. What are the most common angles used for countersinks in PCBs?
The most common angle for countersinks in PCBs is 82 degrees, which corresponds to the angle of a standard flat-head screw. Some designers may use other angles, such as 90 degrees or 100 degrees, depending on the specific requirements of their project or the type of flat-head screw being used.

Conclusion
Countersinks and counterbores are two essential techniques used in PCB design to create recesses for mounting screws and components. While both involve creating holes in the board, they serve different purposes and have distinct characteristics. Countersinks are conical recesses that allow flat-head screws to sit flush with the surface, while counterbores are cylindrical recesses with flat bottoms that accommodate the entire head of a screw.
When choosing between a countersink and a counterbore, consider factors such as the screw type, mounting requirements, component clearance, mechanical strength, and desired aesthetics. By understanding the differences between these two techniques and following best practices for their implementation, you can create PCB designs that are functional, reliable, and visually appealing.
As PCB technology continues to evolve, designers must stay informed about the various techniques and strategies available to optimize their boards. By mastering the use of countersinks and counterbores, along with other essential design elements, you can create PCBs that meet the ever-increasing demands of modern electronics applications.

No responses yet