Introduction to PCB soldering
Soldering is an essential skill for anyone working with electronic circuits and printed circuit boards (PCBs). Whether you’re a hobbyist, a student, or a professional, knowing how to solder correctly is crucial for creating reliable and durable electronic connections. In this comprehensive guide, we’ll walk you through the process of soldering a PCB, from the tools and materials you’ll need to the techniques and best practices for achieving excellent results.
What is PCB Soldering?
PCB soldering is the process of joining electronic components to a printed circuit board using a molten metal alloy called solder. The solder creates an electrical and mechanical bond between the component leads and the copper pads on the PCB. This bond ensures that the components are securely attached and that electrical signals can flow efficiently through the circuit.
Why is PCB Soldering Important?
Proper PCB soldering is essential for several reasons:
-
Reliability: A well-soldered connection ensures that the electronic components are securely attached to the PCB, reducing the risk of loose connections or component failure.
-
Conductivity: Solder creates an excellent electrical connection between the component leads and the PCB pads, allowing signals to flow efficiently through the circuit.
-
Durability: Properly soldered joints can withstand physical stress and vibration, making the assembLED PCB more durable and long-lasting.
-
Appearance: Clean, precise solder joints not only function well but also give the PCB a professional appearance.
Tools and Materials Required for PCB Soldering
Before you begin soldering your PCB, it’s essential to have the right tools and materials on hand. Here’s what you’ll need:
Soldering Iron
A soldering iron is the most crucial tool for PCB soldering. It consists of a heated metal tip that melts the solder, allowing it to flow onto the joint. When choosing a soldering iron, consider the following factors:
- Wattage: A soldering iron with a wattage between 30W and 60W is suitable for most PCB soldering tasks.
- Temperature Control: Some Soldering Irons have adjustable temperature settings, which can be useful for working with different types of solder and components.
- Tip Size: Choose a soldering iron tip that is appropriate for the size of the components and pads you’ll be working with. A medium-sized conical or chisel tip is suitable for most applications.
Solder
Solder is a metal alloy that melts at a relatively low temperature and is used to create the electrical and mechanical connection between components and the PCB. The most common types of solder used in electronics are lead-based and lead-free alloys.
-
Lead-based Solder: Typically composed of 60% tin and 40% lead (Sn60Pb40), this type of solder is easier to work with and has a lower melting point. However, due to environmental and health concerns, lead-based solder is being phased out in many countries.
-
Lead-free Solder: Lead-free solder alloys, such as Sn99.3Cu0.7 or Sn96.5Ag3.0Cu0.5, have become the standard in the electronics industry. These alloys have a slightly higher melting point and may require more skill to work with, but they are safer for the environment and human health.
When choosing solder, also consider the diameter of the solder wire. A diameter between 0.5mm and 1.0mm is suitable for most PCB soldering applications.
Soldering Iron Stand and Sponge
A soldering iron stand provides a safe place to rest your hot soldering iron when not in use. Many stands also include a sponge or brass wool for cleaning the soldering iron tip. Keep the sponge damp (not soaking wet) to effectively clean the tip without lowering its temperature too much.
Flux
Flux is a chemical compound that helps to remove oxides from the surfaces being soldered and promotes the flow of the molten solder. Flux comes in various forms, such as pastes, liquids, and pens. For most PCB soldering applications, a rosin-based flux is recommended, as it is easy to work with and provides good results.
Desoldering Tools
Sometimes, you may need to remove a soldered component or correct a soldering mistake. In these cases, desoldering tools such as a desoldering pump (solder sucker) or desoldering braid (solder wick) can be helpful.
-
Desoldering Pump: A desoldering pump, also known as a solder sucker, is a spring-loaded tool that quickly sucks up molten solder from a joint.
-
Desoldering Braid: Desoldering braid, or solder wick, is a copper braid that absorbs molten solder when heated with a soldering iron. It is useful for removing solder from larger areas or for cleaning up excess solder.
Safety Equipment
When soldering, it’s essential to protect yourself from potential hazards. Use the following safety equipment:
- Safety Glasses: Protect your eyes from solder splashes and fumes.
- Fume Extractor: A fume extractor helps to remove harmful solder fumes from your work area, reducing the risk of respiratory issues.
- Heat-resistant Mat: Place a heat-resistant mat under your work area to protect your workspace from damage caused by the hot soldering iron.

Preparing the PCB and Components for Soldering
Before you start soldering, it’s essential to prepare your PCB and components properly. Follow these steps to ensure the best results:
PCB Inspection
Inspect your PCB for any defects or irregularities, such as broken traces, short circuits, or damaged pads. If you find any issues, address them before proceeding with soldering.
Component Placement
Refer to your PCB’s assembly drawing or schematic to determine the correct placement of each component. Place the components on the PCB, ensuring that they are oriented correctly and that their leads are inserted through the appropriate holes.
Securing Components
To keep the components in place during soldering, you can use one of the following methods:
- Bend the Leads: Gently bend the component leads on the underside of the PCB to hold them in place.
- Use Masking Tape: Place a small piece of masking tape over the component to secure it to the PCB.
Cleaning the PCB and Components
Clean the PCB and component leads with isopropyl alcohol and a lint-free cloth to remove any dirt, grease, or oxidation. This step helps to ensure better solder adhesion and reduces the risk of soldering issues.

Soldering Techniques
Now that your PCB and components are prepared, it’s time to start soldering. Follow these techniques to achieve the best results:
Tinning the Soldering Iron Tip
Before soldering, it’s important to tin the soldering iron tip. Tinning involves coating the tip with a thin layer of solder, which helps to improve heat transfer and prevents oxidation. To tin the tip:
- Set your soldering iron to the appropriate temperature (usually between 300°C and 400°C).
- Clean the tip using a damp sponge or brass wool.
- Apply a small amount of solder to the tip and let it melt, coating the entire tip surface.
- Wipe off any excess solder on the damp sponge or brass wool.
Applying Flux
Apply a small amount of flux to the component lead and PCB pad. This can be done using a flux pen or by dipping the component lead into a container of flux. The flux helps to remove oxides and promote solder flow.
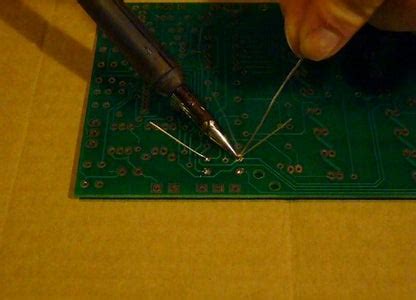
Soldering the Joint
To solder the joint, follow these steps:
- Place the soldering iron tip on the PCB pad and the component lead simultaneously.
- Apply the solder to the joint, not directly to the soldering iron tip. The solder should melt and flow around the lead and pad.
- Keep the soldering iron in place for 1-2 seconds to ensure that the solder has fully melted and flowed around the joint.
- Remove the soldering iron and allow the joint to cool for a few seconds. Avoid moving the component during this time.
Inspecting the Solder Joint
After soldering, inspect the joint to ensure that it is properly formed. A good solder joint should have the following characteristics:
- Concave Shape: The solder should form a concave meniscus around the component lead and PCB pad.
- Shiny Surface: The solder surface should be shiny and smooth, indicating that the flux has been activated and the solder has flowed properly.
- Adequate Coverage: The solder should cover the entire PCB pad and component lead, creating a strong mechanical and electrical connection.
If the solder joint appears dull, has a convex shape, or lacks adequate coverage, you may need to reheat the joint and apply more solder or flux as needed.
Cleaning the PCB
After soldering all the components, clean the PCB to remove any residual flux. Use isopropyl alcohol and a lint-free cloth to gently wipe the PCB surface and around the solder joints. Cleaning the PCB helps to prevent corrosion and improves the overall appearance of the board.

Common PCB Soldering Mistakes and How to Avoid Them
Even with the best techniques, mistakes can happen during PCB soldering. Here are some common mistakes and how to avoid them:
Cold Solder Joints
A cold solder joint occurs when the solder does not melt completely, resulting in a weak and unreliable connection. To avoid cold solder joints:
- Ensure that your soldering iron is set to the correct temperature.
- Keep the soldering iron tip clean and well-tinned.
- Apply the soldering iron to the joint for sufficient time to allow the solder to melt completely.
Bridging
Bridging occurs when excess solder creates an unintended connection between two or more pads or traces. To avoid bridging:
- Use the appropriate amount of solder for the joint size.
- Keep the soldering iron tip clean and well-tinned to prevent solder from accumulating on the tip.
- Use a fine-tipped soldering iron for precise control when working with small components or closely spaced pads.
Overheating Components
Applying too much heat to a component can damage it or cause it to fail prematurely. To avoid overheating components:
- Use the lowest temperature setting that allows the solder to melt effectively.
- Apply the soldering iron to the joint for only as long as necessary to create a good connection.
- Use heat sinks or tweezers to dissipate heat from sensitive components.
Insufficient Solder
Using too little solder can result in a weak or unreliable connection. To ensure sufficient solder:
- Apply enough solder to create a concave meniscus around the component lead and PCB pad.
- If necessary, reheat the joint and apply more solder until the joint is properly formed.
Tips for Successful PCB Soldering
To achieve the best results when soldering your PCB, keep these tips in mind:
-
Practice: Soldering is a skill that improves with practice. Start with simple projects and work your way up to more complex boards.
-
Use the Right Tools: Invest in high-quality soldering tools and materials to ensure consistent and reliable results.
-
Maintain Your Soldering Iron: Keep your soldering iron clean and well-tinned to ensure optimal heat transfer and prevent contamination of the solder joints.
-
Work in a Well-ventilated Area: Solder fumes can be harmful, so work in a well-ventilated area and use a fume extractor if possible.
-
Take Breaks: Soldering requires focus and precision. Take breaks as needed to avoid fatigue and maintain the quality of your work.
Frequently Asked Questions (FAQ)
-
What is the best temperature for soldering a PCB?
The ideal soldering temperature depends on the type of solder and components you are using. For most lead-free solders, a temperature between 350°C and 400°C is recommended. For lead-based solders, a temperature between 300°C and 350°C is usually sufficient. -
Can I use lead-free solder for all PCB soldering projects?
Yes, lead-free solder can be used for all PCB soldering projects. In fact, lead-free solder is now the standard in the electronics industry due to environmental and health concerns associated with lead-based solders. -
How do I know if my solder joint is good?
A good solder joint should have a concave meniscus, a shiny surface, and adequate coverage of the component lead and PCB pad. If your solder joint appears dull, has a convex shape, or lacks proper coverage, you may need to reheat the joint and apply more solder or flux. -
What should I do if I accidentally create a solder bridge?
If you create a solder bridge, you can remove it using a desoldering pump or desoldering braid. Heat the bridged area with your soldering iron and use the desoldering tool to remove the excess solder. Be careful not to overheat the components or damage the PCB Traces. -
Can I reuse solder that has been removed from a joint?
It is generally not recommended to reuse solder that has been removed from a joint. The removed solder may contain impurities or oxides that can compromise the quality of future solder joints. It’s best to use fresh solder for each joint to ensure the best results.
Conclusion
Soldering a PCB requires skill, patience, and the right tools and techniques. By following the steps and tips outlined in this guide, you can create reliable, durable, and professional-looking solder joints for your electronic projects. Remember to prioritize safety, practice regularly, and maintain your tools to achieve the best results. With time and experience, you’ll be able to confidently tackle a wide range of PCB soldering tasks.
No responses yet